Nice and Best ads in India...


Internet Download Manager (IDM) is a tool to increase download speeds by up to 5 times, resume and schedule downloads. Comprehensive error recovery and resume capability will restart broken or interrupted downloads due to lost connections, network problems, computer shutdowns, or unexpected power outages. Simple graphic user interface makes IDM user friendly and easy to use. Internet Download Manager has a smart download logic accelerator that features intelligent dynamic file segmentation and safe multipart downloading technology to accelerate your downloads. Unlike other download managers and accelerators Internet Download Manager segments downloaded files dynamically during download process and reuses available connections without additional connect and login stages to achieve best acceleration performance.

Internet Download Manager supports proxy servers, ftp and http protocols, firewalls, redirects, cookies, authorization, MP3 audio and MPEG video content processing. IDM integrates seamlessly into Microsoft Internet Explorer, Netscape, MSN Explorer, AOL, Opera, Mozilla, Mozilla Firefox, Mozilla Firebird, Avant Browser, MyIE2, and all other popular browsers to automatically handle your downloads. You can also drag and drop files, or use Internet Download Manager from command line. Internet Download Manager can dial your modem at the set time, download the files you want, then hang up or even shut down your computer when it's done. Other features include multilingual support, zip preview, download categories, scheduler pro, sounds on different events, HTTPS support, queue processor, html help and tutorial, enhanced virus protection on download completion, progressive downloading with quotas (useful for connections that use some kind of fair access policy or FAP like Direcway, Direct PC, Hughes, etc.), built-in download accelerator, and many others.

Download

How to Rename the Windows 2003 Domain?

Yes you can, by using the Windows Server 2003 Active Directory Domain Rename Tools.

The Windows Server 2003 Active Directory Domain Rename Tools provide a secure and supported methodology to rename one or more domains (as well as application directory partitions) in a deployed Active Directory forest. The DNS name and/or the NetBIOS name of a domain can be changed using the domain rename procedure.

This functionality is not available in Microsoft Windows 2000 Server family.

Note: Windows Server 2000 AD Domains CAN be renamed if they are still in Mixed mode (see Windows 2000 Domain Rename page for more info).

Microsoft Windows Server 2003 family provides the capability to rename domains in an Active Directory forest after the forest structure is in place. The structure of an Active Directory forest is the result of the order in which you create domains and the hierarchical names of those domains. Beginning with the forest root domain, all child domains derive their distinguished names and default DNS names from the forest root domain name. The same is true of every additional tree in the forest. The way to change the hierarchical structure of an existing domain tree is to rename the domains. For example, you can rename a child domain to have a different parent, or rename a child domain to be a new tree-root domain. In each case, you reposition an existing domain to create a different domain-tree structure. Alternatively, you can rename domains without affecting the structure. For example, if you rename a root domain, the names of all child domains below it are also changed, but you have not created a different domain-tree structure.

In Windows Server 2003, the goal of the domain rename functionality is to ensure a supported method to rename domains when necessary; it is not intended to make domain rename a routine operation. Thus, although renaming domains is possible in Windows Server 2003, the process is complex and should not be undertaken lightly.

Constraints to Restructuring Domains in a Windows 2000 Forest
:

The restructuring capabilities in a Windows Server 2003 forest provide solutions to problems that are not addressed in Windows 2000 Server family. In a Windows 2000 forest, renaming domains is essentially not possible after the forest structure is in place without moving domain contents or recreating them. The constraints associated with making domain name changes or domain-tree restructuring in Windows 2000 Active Directory are prohibitive.

In a Windows 2000 forest, you cannot:


*Change the DNS name or the NetBIOS name of a domain. Although you cannot rename a domain, you can achieve the same results by moving its contents into a new domain that has the name you want the existing domain to have. (Active Directory Object Manager (MoveTree) in the Windows 2000 Server family Support Tools can be used to move directory objects between domains.)

*Move a domain within a forest in a single operation. As above, you can clone items in and move items from a domain, but you cannot move the entire domain itself within a forest.

*Split a domain into two domains in a single operation. To split a domain, you must create a new domain and then move appropriate users and resources from the existing domain into the new domain.

*Merge two domains into a single domain in a single operation. To merge domains, you must move all the contents from one of the domains into the other and then demote all domain controllers in the empty domain and decommission it.

Thus, in a Windows 2000 forest, significant administrative overhead is associated with performing such manual move operations to achieve the domain-tree restructuring or renaming one or more domains.

Constraints to Restructuring Domains in a Windows Server 2003 Forest:

Windows Server 2003 family provides tools with which you can safely rename domains to restructure a Windows 2003 forest. When making a decision about whether to restructure an existing Windows Server 2003 forest, be sure to consider what you cannot do with forest restructuring. Although a Windows 2003 forest has forest restructuring capability, certain types of structural changes are not supported.

In a Windows Server 2003 forest, you cannot:

*Change which domain is the forest root domain. Changing the DNS or the NetBIOS name of the forest root domain, or both, is supported.

*Drop domains from the forest or add domains to the forest. The number of domains in the forest before and after the rename/restructure operation must remain the same.

*Rename a domain with the same name that another domain gave up in a single forest restructure operation.

What do I need to do to make sure Exchange 2000 runs fine on my Windows Server 2003 forest?

If you've installed Exchange 2000 into the forest before running ADPrep, you have to correct some mistakes that were made in the Exchange 2000 schema extensions.

Specifically, both ADPrep and Exchange 2000 define labledURI, houseIdentifier and secretary attributes, but Exchange 2000 does not use the correct LDAP display names (lDAPDisplayName) as defined in RFC 2798.

If you run ADPrep after Exchange 2000 has been installed without fixing these attributes, you can end up with duplicate schema objects with different lDAPDisplayName attributes.

To solve the problem, you must run the inetorgpersonfix.ldf file that is located in \support\ tools\support.cab. This LDIF file fixes the lDAPDisplayName attributes of the three attributes.

First save the inetorgpersonfix.ldf file, then import it using the ldifde utility. Here is an example where we will be importing into the mycorp.com forest:

ldifde.exe /i /f inetOrgPersonFix.ldf /c "DC=X" "DC=mycorp,DC=com"

Note that inetorgpersonfix.ldf uses DC=X as the forest path, which is why we needed to use the /c switch to replace it with our own forest path.

More Information :
http://www.petri.co.il/

Scoping GPOs

Group Policy is a powerful tool for managing the Windows 2000 (and later) environment. The value of Group Policy can only be realized through properly applying the GPOs to the Active Directory containers you want to manage. Determining which users and computers will receive the settings in a GPO is referred to as “scoping the GPO”. Scoping a GPO is based on three factors:
The site(s), domain(s), or organization unit(s) where the GPO is linked.

The security filtering on the GPO.

The WMI filter on the GPO.

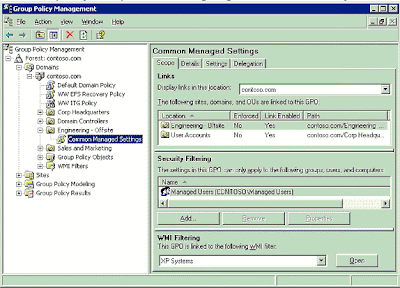
This section will discuss how to utilize GPMC to properly manage the scope of a GPO and the Active Directory components you want to manage. Figure 7 shows the GPO scope tab.


Linking GPOs


The primary mechanism by which the settings in a GPO are applied to users and computers is by linking the GPO to a site, domain, or OU in Active Directory. The location where a GPO is linked is referred to as the Scope of Management, or SOM (also sometime abbreviated as SDOU in previous white papers). There are three types of SOMs: sites, domains, and OUs. A GPO can be linked to multiple SOMs, and a SOM can have multiple GPOs linked to it. A GPO must be linked to a SOM for it to be applied.

Note:

GPOs are not stored on a per-SOM basis, but rather per domain. Thus, if you link a GPO to an OU, the GPO does not actually reside in that OU. A GPO is a per domain object that can be linked anywhere in the forest (although performance issues may exist where cross-domain links are used). One of the goals for GPMC is to make the distinction between links and actual GPOs clearer.

With GPMC, you can link a GPO to SOMs using any of the following methods:

Right click a domain or OU node, and choose Create and Link a GPO here. This option is analogous to choosing New in the old Group Policy user interface prior to GPMC. (This old Group Policy interface was the Group Policy tab on the properties dialog box of a site, domain, or OU in Active Directory Users and Computers or Active Directory Sites and Services snap-ins.). Although this operation is presented as one action to the user, there are actually two operations taking place. First, a GPO is created in the domain, and second, a link to that GPO is created on the domain or OU from where you started the shortcut menu.

Right click a site, domain, or OU node, and choose Link an existing GPO here. This option is analogous to choosing Add in the old Group Policy user interface prior to GPMC. This requires that the GPO already exists in the domain.

Using drag and drop, drag a GPO from under the Group Policy objects node to the OU. This drag and drop functionality can only be performed within the same domain.

Note:

By default, new user and computer accounts are created in the CN=Users and CN=Computers containers. These containers are not actually OUs, so GPOs cannot be directly applied to these containers, however, objects in these containers do inherit GPOs linked to the domain and sites. It is possible to specify a different container in which to place either new user accounts, new computer accounts, or both. This allows you to have greater control for applying GPOs to newly created user and computer objects, before they are moved to their final locations in Active Directory. To specify new locations for user or computer accounts, use Redirusr.exe (for users) or Redircomp.exe (for computers) in the domain you want to manage. The domain administrator can use these tools to specify an OU in which to place all new user or computer accounts when they are created. Redirusr.exe (for user accounts) and Redircomp.exe (for computer accounts) are two new tools included with Windows Server 2003 and are located in the %windir%\system32 directory. For more information about redirecting containers for users and computers, see article Q324949, "Redirecting the Users and Computers Containers in Windows Server 2003 Domains," in the Microsoft Knowledge Base. To find this article, see the Microsoft Knowledge Base link on the Web Resources page at http://www.microsoft.com/windows/reskits/webresources.

Security Filtering

By default all Authenticated Users that are located in the SOM (and its children) where a GPO is linked will apply the settings in the GPO.

You can further refine which users and computers will receive the settings in a GPO by managing permissions on the GPO. This is known as security filtering. In order for GPO to apply to a given user or computer, that user or computer must have both Read and Apply Group Policy permissions on the GPO. By default, GPOs have permissions that allow the Authenticated Users group both of these permissions. This is how all authenticated users receive the settings of a new GPO when it is linked to a SOM (OU, domain or site). These permissions can be changed however to limit the scope of the GPO to a specific set of users, groups, and/or computers within the SOM(s) where it is linked.

GPMC simplifies how administrators manage security filtering for a GPO. Without GPMC, administrators were required to use the ACL editor, to manually set the Read and Apply Group Policy permissions for various security principals (users, computers, and groups) to modify the scope of the GPO. In GPMC, this process is no longer necessary. The administrator can just add or remove security principals in the security filtering section in the Scope tab for the GPO or the GPO link. This will automatically set or remove the Read and Apply Group Policy permissions for that security principal on that GPO. In the example in Figure 7, the security filtering on the “Common Managed Settings” GPO has been modified so that only members of the “Managed Users” group can receive the settings. Note that members of this group that are not located in either the “Engineering – Offsite” or “User Accounts” OUs will not receive the settings in this GPO.

If the administrator needs to access the detailed permissions, they are still available using the ACL editor when you can access using the Advanced button on the Delegation tab for the GPO. For example, if you need to set permissions to Deny, you can do this using the ACL editor. Groups with Deny permissions will appear as having Custom permissions on the Delegation tab. In general, it is recommended that you avoid the use of Deny permissions for managing Group Policy.

Linking WMI Filters

WMI Filters allow an administrator to dynamically determine the scope of GPOs based on attributes (available through WMI) of the target computer. A WMI filter consists of one or more queries that are evaluated to be either true or false against the WMI repository of the target computer. The WMI filter is a separate object from the GPO in the directory. To apply a WMI filter to a GPO, you link the filter to the GPO. This is shown in the WMI filtering section on the Scope tab of a GPO. Each GPO can have only one WMI filter; however the same WMI filter can be linked to multiple GPOs.

When a GPO that is linked to a WMI filter is applied on the target computer, the filter is evaluated on the target computer. If the WMI filter evaluates to false, the GPO is not applied. If the WMI filter evaluates to true, the GPO is applied. Note that client support for WMI filters exists only on Windows XP and later operating systems. Windows 2000 clients will ignore any WMI filter and the GPO is always applied, regardless of the WMI filter.

Platform Dependencies

GPMC exposes features that are available in the underlying operating system. Because new features have been added to Group Policy since Windows 2000, certain features will only be available in GPMC depending on the operating system that has been deployed on the domain controllers and clients. This section describes these dependencies. In general, there are four key issues that determine whether a feature is available in GPMC:


Windows Server 2003 Active Directory schema must be available to delegate Group Policy Modeling or Group Policy Results

Windows Server 2003 domain controller must be available to run Group Policy Modeling

Windows Server 2003 domain configuration (ADPrep /DomainPrep) must be available to use WMI Filters

Clients must be running Windows XP or Windows Server 2003 in order to generate Group Policy Results data.

Windows and Active Directory platform dependencies are summarized below
-------------------------------------------
Dependency

Windows Server 2003 Active Directory Schema

Feature

Delegation of Group Policy Modeling and Group Policy Results

Reason

The Generate Resultant Set of Policy (Logging) and Generate Resultant Set of Policy (Planning) permissions needed for this operation are only available with the Windows Server 2003 Active Directory schema
-------------------------------------
Dependency

Windows Server 2003 Domain Controller in the forest

Feature
Group Policy Modeling

Reason

The simulation is performed by the Resultant Set of Policy Service which is only available on domain controllers running Windows Server 2003
-------------------------------------
Dependency

Windows Server 2003 domain configuration (DomainPrep)

Feature

WMI Filters

Reason

ADPREP /DomainPrep configures the domain for Windows 2003 Active Directory including configuration for WMI Filters
-------------------------------------
Dependency

Clients must be running Windows XP or Windows Server 2003

Feature

Group Policy Results

Reason

Clients must be instrumented to log Group Policy Results data when policy is processed. This capability is only available on the listed systems
-------------------------------------

There is no dependency from the Group Policy perspective on whether a domain is in native mode or mixed mode.

Samsung i8510


Samsung i8510: Features and Specifications

* Symbian OS
* HSDPA
* GPRS Class 10 (4+1/3+2 slots), EDGE Class 10
* Wi-Fi 802.11 b/g
* Accelerometer
* 140 gms
* UMTS 900 and UMTS 2100
* GSM 1900, GSM 1800, GSM 850 and GSM 900
* TFT screen with resolution of 240 x 320 pixels
* microUSB
* Stereo speakers
* Business card scanning
* Real Player with other formats also being supported
* A resolution of 8 MP of camera
* GPS receiver with assisted GPS function
* Bluetooth v2.0 with A2DP


Business features of this mobile device:

The mettle of excellence is one of the most important things that is visible in the Samsung i8510 with features which are able to control most of the requirements of the user in an effective manner. Business is one of the major aspects which has been given a definitive attention with this mobile phone which has certain features that are able to save both time as well as effort of the user. One of the examples is the process of automatic business card scanning technology which enables the user to store the information being printed on a business card or a visiting card. Another notable feature in this mobile phone is the feature of GPS assistance for the user in terms of providing her/ him the required help for getting to destinations in the least amount of time.


This GPS receiver is one of the devices whose performance is enhanced with the presence of assisted GPS function which is also another major aspect of this mobile device. These features are also quite capable of being accessed and used in quite an effective manner by the Symbian operating system.

Full Information : http://www.mobilerainbow.org/samsung/samsung-i8510.html

Administer Exchange 2003 from Windows XP SP1

How can I manage my Exchange 2003 server from a Windows XP/2000/2003 workstation?

This article describes the steps to be taken in order to be able to administer an Exchange 2003 server from a Windows XP Pro computer that is installed with SP1 or SP1a or from a Windows Server 2003 Member Server.

Note: For an Exchange 2000 version of this page and for more background on this issue (with detailed screenshots) click on the following article: Administer Exchange 2000 from Windows XP SP1.

You can administer Exchange Server 2003 servers from a Windows computer by using Exchange Setup to install only Microsoft Exchange System Management Tools.

Note: If you have not installed an Exchange 2003 server in your organization, you must first run ForestPrep. ForestPrep extends the Active Directory schema to include Exchange-specific classes and attributes, and creates the container object for the Exchange organization in Active Directory.

To install Exchange System Management Tools ensure that the computer meets the following requirements:

*
The computer is running Windows XP, Windows Server 2003, Windows 2000 Professional, or Windows 2000 Server SP3.
*
The computer name does not contain unsupported characters.
*
The language version matches any previous installation of Exchange 2000 System Management Tools (except for upgrades from English to Korean, Traditional Chinese, or Simplified Chinese).
*
Log onto the domain with an account that has local machine administrator permissions.

Depending on the version of Windows that is running on the computer, install the required services.

Windows XP Service Pack 1

*
Internet Information Services Snap-In component
*
SMTP Service component
*
World Wide Web Service
*
Windows Server 2003 Administration Tools Pack, AdminPak.msi

Windows XP SP2

*
Internet Information Services Snap-In component
*
Windows Server 2003 Administration Tools Pack (AdminPak.msi)

Windows Server 2003

*
Internet Information Services Manager component

Windows 2000 Professional SP3

*
Internet Information Services Snap-In component
*
Windows Server 2000 Administration Tools Pack (AdminPak.msi)

Windows 2000 Server SP3

*
Internet Information Services Snap-In component
*
Windows Server 2000 Administration Tools Pack (AdminPak.msi)
*
SMTP Service component
*
NNTP Service component

Next, run Exchange Setup, located in the SETUP\I386 folder. On the Component Selection page, set the installation action to Custom, and then select Microsoft Exchange System Management Tools.


After the installation is complete go to the Start menu and see if the Microsoft Exchange folder and shortcuts have been successfully created.


Finally, you must install the latest Exchange 2003 Service Pack:

Exchange 2003 Service Pack 2 (SP2) was released on the 19th of October 2005. You can download SP2 for Exchange 2003 right here:

Download Exchange 2003 SP2 (109mb)

Best Street Bike Tricks And Crashes

street bike tricks


INSANE STREET BIKE STUNTS :


StarBoyz street bike stunts :


Imortal Bike Stunts (superbike street stunting):


Street Bike Stunts ( MUST SEE )


Street Bike Stunts


Best Street Bike Stunts And Crashes !!

Chennai 28 - Movie Songs

Yaaro :


Un Parvai Melay :


Ennenamo Aguthu


Natpukullae :


Vazhkaya Yosingada :

The Inkjet-Printer Pen

The pen of the future will use inkjet technology to deliver a multitude of colours from its tip, according to recent filings from prolific patenter Silverbrook Research in Balmain, Australia.

Inkjet printer heads are now cheaply mass-produced and small enough to fit into the stem of a pen in place of a nib or ballpoint. Silverbrook's pen body is about as thick as a fountain pen, with a battery-powered microelectromechanical print head near the tip that pumps out fine jets of ink from a replaceable cartridge.

A smooth roller point at the tip of the pen holds the jet at a fixed distance from the paper and pressing the point onto the paper switches the jet on and off. Varying the pressure varies the thickness of the line by controlling the number of jets that pump ink - a hard push makes a thick line and vice versa.

The roller point can also sense the direction of movement over the page and make the jet change shape to mimic the behaviour of a pen nib. And if the cartridge has separate chambers of cyan, magenta, yellow and black ink, a switch on the side of pen will allow writing and drawing to be done in a rainbow of colours.

Read more about the inkjet pen design, here.

Double delay for pirates


Much effort is going into ways of making computer game and movie discs hard to copy, to foil copyright pirates. The latest, and perhaps the cleverest, comes from Philips. It exploits two unrelated features that already exist in the current DVD standard, in the new Blu-ray disc and also the Universal Media Disc, used by the PlayStation Portable games console.

Most disc pressings now spread a recording across a two layers on a single side, and there is a little-used provision for barcoding discs with etched marks near the centre hole.

Philips' scheme involves recording matching digital flags in the two layers of the same disc, while using the barcode to define the time delay between the two marks. A player reads the barcode to learn the defined delay, and then checks the actual delay by quickly focusing on one layer after the other.

Even if a pirate copies a game or movie to a dual layer disc, there is virtually no chance of getting the marks in the different layers to have the same delays as the original. And if the timings don't match, the disc won't play.

The new system relies on existing features, so it can be made to work with existing games consoles, which are programmed by the game being played, and the same applies to the new Blu-ray systems. It can also work with computers that incorporate programmable software to play games or movies.

Read more about the disc-pirate foiler here (pdf format).

Tagged by laser

More and more items are being labelled with radio frequency identity (RFID) tags. These can be read wirelessly and from a distance - but singling out one item in a crowded warehouse, supermarket or library is getting ever harder. The solution is a form of laser guidance, according to a patent application filed by NewScientist.com user, Dan Steinberg of Virginia, US.

His idea is to make the RFID reader very directional and able to shine a laser beam of light at the tags it finds, like a sniper's sight.

RFID tags respond to an interrogating radio signal from a reader device by sending back a signal with an identifying code that displays on the reader's screen. If the interrogating radio signal is beamed out broadly and there are a lot of tags in range, the reader may display a bewildering list of IDs.

So the new reader is more like a handheld flashlight which transmits its interrogating signal through a narrow aperture in an absorptive plate. Only tags directly in of the beam the reader receive enough signal to respond.

Once a response is received, the reader emits a thin beam of laser light in the direction of the received signal. This marks the tagged item, and if it is in a box or behind a partition the spot shows where to look for it.

How to Enabling ASP ?

Preface:

ASP and ASP.NET are NOT! the same thing. Some people enable ASP.NET hoping that ASP will work also, this is just not the case. IIS 6.0 comes with ASP disabled by default, and this will show you how to enable it.

Method:

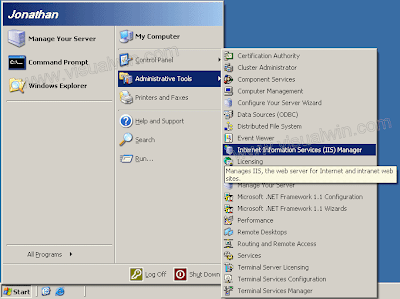
Load IIS from the Administrative tools in the Control Panel by clicking Start -> Administrative Tools -> IIS Manager (or loading the Control Panel, entering the Administrative Tools folder, and double clicking IIS Manager).


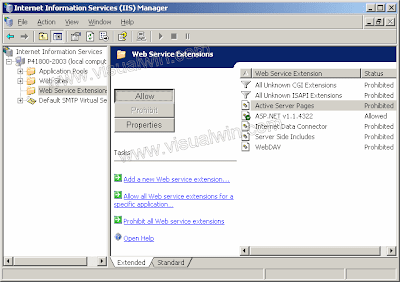
Go to the Web Service Extensions tab, click Active Server Pages, then press the "Allow" button on the left


Your ASP pages should now work.

Internet Explorer Enhanced Security Configuration Considerations

Windows Server 2003 includes a new default security configuration for Internet Explorer, called Internet Explorer Enhanced Security Configuration (ESC). ESC impacts the Security Zones and Privacy settings within the Internet Explorer Maintenance settings of a GPO. The Security Zones and Privacy settings can either be ESC enabled or not.


When you edit settings for Security Zones and Privacy settings in a GPO from a computer where ESC is enabled, that GPO will contain ESC-enabled settings. When you look at the HTML report for that GPO, the Security Zones and Privacy header will be appended with the text (Enhanced Security Configuration enabled).


When you edit settings for Security Zones and Privacy settings in a GPO from a computer where ESC is not enabled, that GPO will contain ESC-disabled settings. ESC is not enabled on any computer running Windows 2000 or Windows XP, nor on computers running Windows Server 2003 where ESC has been explicitly disabled.

ESC settings deployed through Group Policy will only be processed on and applied by computers where ESC is enabled. ESC settings will be ignored on computers where ESC is not enabled (all computers running Windows 2000 and Windows XP, and Windows Server 2003 computers where ESC has been explicitly disabled). The converse is also true: A GPO that contains non-ESC settings will only be processed on and applied by computers where ESC is not enabled.

Furthermore, ESC impacts the functionality contained in the HTML reports produced by GPMC as follows.


On computers with ESC enabled a prompt appears when you attempt to view reports in GPMC. This happens because the reports contain a script that allows you to expand and collapse sections of the reports using Show and Hide. To use the Show and Hide functionality in these reports, you must add the About:security_MMC.exe site to the Trusted Sites zone in Internet Explorer. This site represents all Web pages that are hosted inside MMC. You can do this by clicking Add on the Internet Explorer prompt. This opens the Trusted sites dialog box with the correct entry (About:security_mmc.exe) for the page being called by GPMC. Click Add, and then click Close in the Trusted sites dialog box to add this site to the Trusted sites zone. If the About:security_mmc.exe site is not added to the Trusted sites zone, the reports appear fully expanded and cannot be collapsed.


In addition, the Explain text for a given setting in the HTML report is available by clicking on any setting in the Administrative Templates section of the GPO, assuming you have already added About:security_MMC.exe to the list of trusted sites. A prompt appears when you attempt to view the Explain text for a given administrative template setting in the HTML report. This prompt will ask if you want to add the about:blank site to the list of trusted sites. This is not recommended because it could significantly compromise the security of Internet Explorer on that computer. If you do not add the about:blank site to the list of trusted sites, you will not lose significant functionality in GPMC. You will still be able to view the Explain text, however, the Print and Close buttons in the Explain text dialog box will not be functional. To close the dialog, use the close box in the upper right corner.

Group Policy Inheritance

Group Policy can be applied to users and computers at a site, domain, or OU. GPOs from parent containers are inherited by default. When multiple GPOs apply to these users and computers, the settings in the GPOs are aggregated. For most policy settings, the final value of a given policy setting is set only by the highest precedent GPO that contains that setting. (However, the final value for a few settings will actually be the combination of values across GPOs.) Precedence of GPOs determined by the order of processing for the GPOs. GPOs processed last have highest precedence. GPOs follow the SDOU rule for processing; site first, then domain and followed by OU including nested OUs. A nested OU is one that has another OU as its parent. In the case of nested OUs, GPOs associated with parent OUs are processed prior to GPOs associated with child OUs. In this processing order, sites are applied first but have the least precedence. OUs are processed last and have the highest precedence.

There are several Group Policy options that can alter this default inheritance behavior. These options include:

Link Order – the precedence order for GPOs linked to a given container. The GPO link with Link Order of 1 has highest precedence on that container.

Block Inheritance – the ability to prevent an OU or domain from inheriting GPOs from any of its parent container. Note that Enforced GPO links will always be inherited.

Enforcement – (previously known as “No Override”) the ability to specify that a GPO should take precedence over any GPOs that are linked to child containers. Enforcing a GPO link works by moving that GPO to the end of the processing order.

Link Status – determines if a given GPO link is processed or not for the container to which it is linked.
These items are described in more detail below.

If multiple GPOs are linked to the same container and have settings in common, there must be a mechanism for reconciling the settings. This behavior is controlled by the link order. The lower the link order number, the higher the precedence. Information about the links for a given container are shown on the Linked Group Policy Objects tab of a given container, as in Figure 8. This pane shows if the link is enforced, if the link is enabled, the status of the GPO, if a WMI Filter is applied, when it was modified, and the domain container where it is stored. An administrator or users that have been delegated permissions to link GPOs to the container can change the link order by highlighting a GPO link and using the up and down arrows to move the link higher or lower in the link order list.


GPOs are inherited from parent containers. For example, a GPO linked to an OU will be inherited by child OUs. The Group Policy Inheritance tab for a given container shows all GPOs (except for GPOs linked to sites) that would be inherited from parent containers, as shown in Figure 9. The precedence column on this tab shows the overall precedence for all the links that would be applied to objects in that container, taking into account both Link Order and the Enforcement attribute of each link, as well as Block Inheritance on any SOMs. Note that the Group Policy Inheritance tab does NOT show the impact of GPOs linked to sites, because it is not possible to determine which site would apply, unless a particular target computer is identified.

It is possible to prevent containers from inheriting GPOs linked to parent containers by blocking the inheritance on the OU or domain. Blocking inheritance on a container will prevent all GPOs from parent containers from applying to the blocked container, except for GPOs that are marked as Enforced. Administrators can right-click the domain or OU and select Block Inheritance from the context menu to set GPO blocking on the container. If inheritance is blocked for an OU or domain, its icon will appear with a blue exclamation mark in the console tree.

An administrator can prevent the settings in a GPO linked to a container from being overwritten by settings linked to GPOs in child containers (which normally would have higher precedence) by setting the GPO link to Enforced (formerly known as No Override). This also will prevent the GPO link from being blocked at containers that have been set to Block Inheritance. GPO-links that are enforced appear with a gray padlock icon in both the console tree and in the details pane.

A GPO link can be set to Enabled to allow it to be processed. If the link is not set to Enabled, processing of the linked GPO is disabled. The GPO link can be either enabled or disabled by right-clicking the link and selecting the Link Enabled option. A check beside this option indicates that the link is enabled and will be processed.

Slumdog Millionaire - Oscar Videos


Oscars 2009 Freida Pinto & Cast of SLUMDOG MILLIONAIRE


"Slumdog Millionaire" at the Oscars !:: Gets 10 nominations


Slumdog stars shocked by praise


A. R. Rahman Performing Live at the Oscars - "O...Saya" & "Jai Ho"


Oscar for Best Original Song - A R Rahman - JAI HO


Slumdog kids at the red carpet


A R Rahman wins Oscar for Jai Ho

Last 5 seconds of your exam ????????

Last 5 seconds of your exam???????? ??

remember your exam days!!!!!!!! !!!!!!!!! !!
;
!

!

!

!

!

!

!

!

!

!

!

!

!

!

!

!

!

!


How to look Happy at work?


How to look Happy at work

As of today all personnel will be expected to look happy at work. Rubber bands and paper clips will be provided at no cost .

* Workload getting to you?
* Feeling stressed?
* Too many Priority 1 assignments?

Here is the new low cost way to cope with multiple Priority 1 assignments!

Take 2 paperclips and rubber bands. Fig 1

Assemble them as shown on the picture. Fig. 2

Apply as shown in fig 3.

Enjoy your day.
This new office equipment will help you to reach the end of the day
with a smile on your face!

Intel Xeon Processor 7000 Sequence

The Intel® Xeon® processor 7400 series, offers the industry's highest virtualization performance so you can do more with less. With key platform innovations built-in, the Intel® Xeon® processor 7400 series offers more headroom, reliability, and the highest expandability for large-scale server consolidation.


Features and benefits

Intel® Xeon® processor 7400 series


* Leading scalable performance with decreased footprint and power demands
* Industry's lowest watt per core platform with available 65 watt processor
* Based on 45nm Intel® Core™ microarchitecture enabling low voltage options for ultra-dense deployments
* Compatibility with previous generation Intel® Xeon® processor 7300 series

Hardware-assisted virtualization technology

# Highest virtualization performance, leading on all industry standard virtualization benchmarks¹
# More virtual machines on all servers
# Investment protection and flexibility with Intel® Virtualization Technology FlexMigration (Intel® VT FlexMigration)¹
# More efficient disaster recovery and high availability through virtualization
# Broadest ecosystem support with virtualization software providers and leading OEMs

Full Information : http://www.intel.com/products/processor/xeon7000/index.htm?iid=servproc+body_xeon7400badge

Why do I get lots of 407 and 408 Event IDs in my DNS event log?

If you also have NAT installed on the same server that hosts the DNS server, you will get these errors. NAT has a DNS Proxy setting that enables DHCP clients to direct DNS queries to the NAT server. The client DNS queries are then forwarded to the NAT server's configured DNS server. The DNS Proxy and the DNS Server service cannot coexist on the same host, if the host is using the same interface and IP address with the default settings.

To workaround this issue, use one of the following three methods:

  1. Install NAT and DNS on different servers.

  2. Use the DHCP server Service in NAT, NOT the DHCP Allocator and DNS Proxy.

  3. Set the DNS Server so it doesn't listen on the IP address of the NAT private interface:

    1. In the DNS MMC snap-in, right click the DNS server and press Properties.

    2. In the Listen on section of the Interfaces tab, select the Only the following IP addresses check box.

    3. Select the IP address that you do NOT want the DNS server to listen on, and press Remove. DNS will NOT respond to queries that are directed to this removed address.

    4. Press OK and close the snap-in.

How to upgrade Windows 2000 domain controllers to Windows Server 2003

This article discusses how to upgrade Microsoft Windows 2000 domain controllers to Microsoft Windows Server 2003 and how to add new Windows Server 2003 domain controllers to Windows 2000 domains.

Domain and forest inventory

Before you upgrade Windows 2000 domain controllers to Windows Server 2003 or before you add new Windows Server 2003 domain controllers to a Windows 2000 domain, follow these steps:Inventory the clients that access resources in the domain that host Windows Server 2003 domain controllers for compatibility with SMB signing:

Each Windows Server 2003 domain controller enables SMB signing in its local security policy. Make sure that all network clients that use the SMB/CIFS protocol to access shared files and printers in domains that host Windows Server 2003 domain controllers can be configured or upgraded to support SMB signing. If they cannot, temporarily disable SMB signing until updates can be installed or until the clients can be upgraded to newer operating systems that support SMB signing. For information about how to disable SMB signing, see the "To disable SMB signing" section at the end of this step.

More Information : http://support.microsoft.com/?kbid=325379#appliesto

Defragment Exchange 2003 Server Databases

Exchange databases run a defragmentation process once a day by default. This process rearranges mailbox store and public folder store data more efficiently, eliminating unused storage space. Exchange database online defragmentation occurs automatically as part of the database maintenance process. Online defragmenting is performed automatically at 2:00 AM every day by default. Online defragmentation makes additional database space available by detecting and removing database objects that are no longer being used. The defragmentation process provides more database space without actually changing the file size of the database.
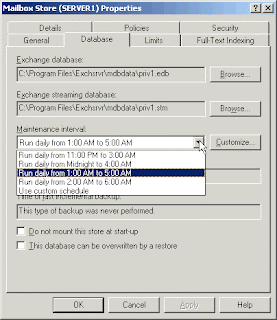
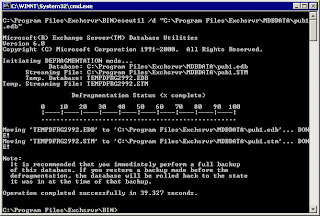

The following are two ways to schedule database defragmentation:


1. To schedule database defragmentation for an individual database, on the Database tab of a mailbox store or public folder store object, configure the maintenance interval using the Maintenance interval option.

2. To schedule database defragmentation for a collection of mailbox stores and public folder stores, on the Database (Policy) tab of a mailbox store or a public folder store policy, configure the maintenance interval using the Maintenance interval option.

Although online defragmentation provides some additional database space, you should also defragment your Exchange database offline to reduce the physical size of your Exchange database. You can perform offline defragmentation by using the ESE utility (ESEUTIL) while your mailbox stores and public folder stores are offline.

You would perform offline defragmentation, for instance, if you had recently moved a large number of users from a server running Exchange 2000/2003. In that case, defragmenting offline decreases the size of your Exchange databases by rearranging the data on the server’s Exchange databases, and discarding any unused database pages.

Note that the length of time that the defragmentation will take will depend on the amount of white space in the database, as well as the size of the transactions recorded in the database, and your hardware specifications.


Offline defragmentation creates a new database by copying all records and tables from the old database into the new database. Because this is a copy, defragmentation requires free disk space equal to the size of the database (actually, you'll need 110% of free space).

Very important note: After defragmentation is complete, ESE considers the new database to be a different database from the original. Therefore, the original database is deleted and its member log files cannot be replayed into the successor database.

A full backup should be completed as soon as possible!

Prior incremental or differential backups are no longer useful because they reference database pages that were reordered by the defragmentation process. ESEUTIL defragments a database by creating a new database, copying the old database records to the new one, and discarding unused database pages, which results in a newly organized compact database file.

Microsoft recommends a conservative 5 - 7 GB per hour for a defrag operation, which means that your server will be offline for as long as it takes, assuming no hardware failures will occur.

When you run ESEUTIL /d against a database to defragment it, the streaming file associated with the database is automatically defragmented. This is the default behavior.

For example, if you run the following command at a command prompt:

eseutil /d "c:\program files\exchsrvr\mdbdata\priv1.edb"

The Priv1.edb and Priv1.stm files are defragmented. If you do not want the streaming file to be defragmented, include the /i option.

Run ESEUTIL with the /p switch to configure ESEUTIL to create the new defragmented database on an alternate location (for example, to a location on a different hard disk). This switch lets you preserve your original defragmented database (which lets you revert back to your original database if necessary). This switch also significantly reduces the amount of time it takes to defragment a database, because you are rebuilding to a new location, rather then rebuilding the database in place.

Note: The database you wish to defragment must be taken offline (i.e. dismounted) before attempting to perform the defragmentation operation. When you run ESEUTIL against a Microsoft Exchange computer where it's database is still mounted you will receive the following error message:

Operation terminated with error -550

If the database is still mounted, use the following steps to dismount the database, and then run ESEUTIL:

1. Start Exchange System Manager.

2. Right-click the database that you want to dismount.

3. Click All Tasks, and then click Dismount Store.

Security Configuration and Analysis Overview

Security Configuration and Analysis is a tool for analyzing and configuring local system security.

Security Analysis

The state of the operating system and applications on a computer is dynamic. For example, security levels may be required to change temporarily to enable immediate resolution of an administration or network issue; this change can often go unreversed. This means that a computer may no longer meet the requirements for enterprise security.

Regular analysis enables an administrator to track and ensure an adequate level of security on each computer as part of an enterprise risk management program. Analysis is highly specified, information about all system aspects related to security is provided in the results. This enables an administrator to tune the security levels, and most importantly, detect any security flaws that may occur in the system over time.

Security Configuration and Analysis enables quick review of security analysis results: recommendations are presented alongside current system settings, and icons or remarks are used to highlight any areas where the current settings do not match the proposed level of security. Security Configuration and Analysis also offers the ability to resolve any discrepancies revealed by analysis.

If frequent analysis of a large number of computers is required, as in a domain-based infrastructure, the Secedit.exe command line tool may be used as a method of batch analysis. However, analysis results still must be viewed using Security Configuration and Analysis. For more information, see Automating security configuration tasks

Security Configuration

This tool can also be used to directly configure local system security. Through its use of personal databases, you can import security templates created with the Security Templates snap-in, and apply these templates to the Group Policy object for the local computer. This immediately configures the system security with the levels specified in the template. For more information, see Managing Security Templates